How to Install HelperHat
Last Updated: May 28, 2026.
Installing HelperHat on your website is quick and easy. Choose the path that matches how your website is managed, then follow the steps below to start providing simplified customer support with HelperHat.
If you already have your HelperHat installation code, add it to your website's HTML. If not, use the How to Copy the HelperHat Installation Code? section below first.
- Access your website's HTML files. Depending on how your site is built, you might need to log into your content management system (CMS) or use an FTP client to access your files directly.
- Locate the closing
</body>tag in the HTML of each page where you want to enable HelperHat. This is usually found near the bottom of your HTML files. - Paste the HelperHat installation code directly before the closing
</body>tag. - Save and upload your changes. If you're using a CMS, simply save your updates. If you're editing files directly, be sure to upload the modified files back to your server.
Use the HelperHat AI Live Chat plugin to install live chat without editing theme files.
- Install and activate the HelperHat AI Live Chat plugin.
- Go to Settings > HelperHat in your WordPress admin area.
- Paste your HelperHat business ID and save your changes.
- Open your public website and confirm the HelperHat widget appears.
Read the full WordPress install guide for the plugin flow and the manual fallback.
Use the HelperHat GTM template when your site already runs through Google Tag Manager.
- Make sure your Google Tag Manager container is installed on every page where HelperHat should appear.
- Add the HelperHat Live Chat template to your GTM workspace.
- Create a HelperHat tag, paste your business ID, and use the All Pages trigger.
- Preview the container, confirm HelperHat appears, and publish.
Read the full Google Tag Manager install guide for the Gallery flow and manual import fallback.
To begin you'll need your unique HelperHat installation code which is provided during the HelperHat onboarding steps. It should look something like this:
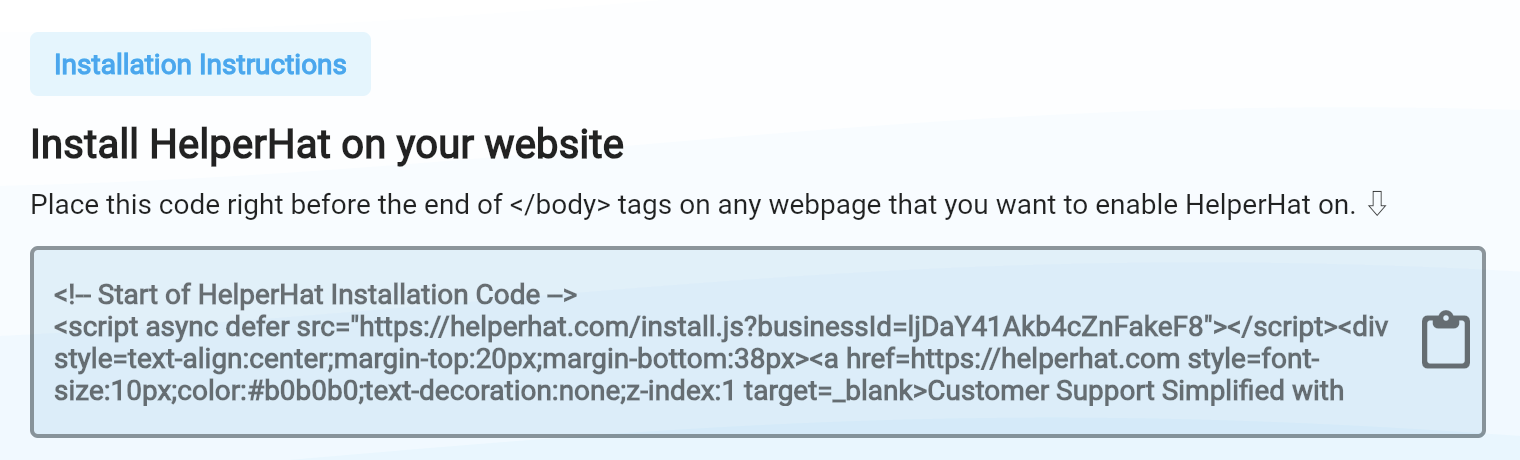
If you've already signed up successfully, then follow these instructions to get your installation code:
- Log in to your HelperHat account.
- Go to the Settings page on HelperHat.
- Copy the installation code provided. It should look something like this:
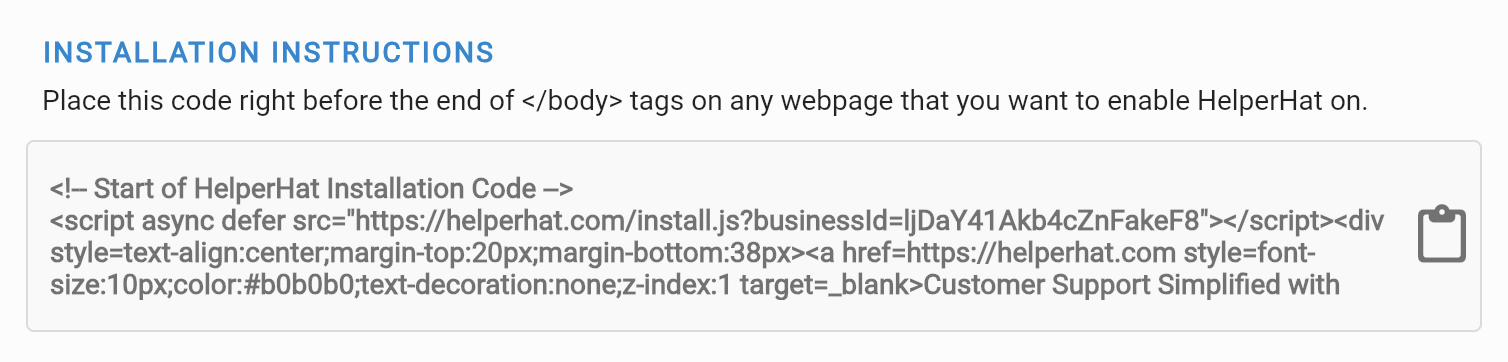
If you'd like to open the HelperHat chat window dynamically from a button or
link on your website,
you can use the openHelperHat function that is automatically
provided by the HelperHat installation script.
Here's how to add it:
- Ensure the HelperHat installation script is already included on your website. If not, refer to the "How to Install HelperHat on Your Website?" section above.
- Add the following HTML code wherever you want the button or link to appear on your website:
<!-- A button to open the HelperHat chat -->
<button onclick="openHelperHat()">
    Open HelperHat
</button>

<!-- Or A text link to open the HelperHat chat -->
<a href="javascript:void(0);" onclick="openHelperHat()">
    Open HelperHat
</a>
That's it! When a user clicks the button or link, it will open the HelperHat chat window, just like clicking the floating icon on your website.
Note: The openHelperHat function relies on the
floating icon being available on the page.
If the floating icon is hidden or not displayed for any reason, the function
may not work.
After installing HelperHat on your website, you can further enhance its AI responses by adding custom data tailored to each customer. This personalization can include, but is not limited to:
- Customer's Name
- Customer's Order History
- Customer's Subscription Plan Details
- Any other relevant customer-specific information
By providing these details through the
window.customHelperHatData variable,
HelperHat's AI can deliver more personalized and contextually relevant
responses to your
customers.
How to Add Custom Data:
To ensure the custom data is available when HelperHat initializes, you must
define the
window.customHelperHatData variable in a
<script> block
before including the HelperHat installation script.
Why This Is Important: Defining
window.customHelperHatData
before
the installation script ensures the data is ready and accessible when the
HelperHat script
loads and initializes.
If the custom data is defined afterward, it will not be available for
HelperHat's AI to use.
Place the custom data script above the HelperHat installation script in your HTML, as shown below:
Example: Adding Multiline Data
<!-- Start of HelperHat Custom Data -->
<script>
    window.customHelperHatData = `
    Customer's Name: Jane Smith
    Customer's Order History:
        - Order #456:
          2 Floral Dresses, Item #123
        - Order #789:
          1 Silk Scarf, Item #456
    `;
</script>

<!-- Start of HelperHat Installation Code -->
<script async defer src="https://helperhat.com/install.js?businessId=123"></script>
In this example, multiple lines of data are provided, including the customer's name, order history, and cart details. HelperHat will use this information to address the customer by name and reference their past interactions and preferences.
Example: Adding Single Line Data
<!-- Start of HelperHat Custom Data -->
<script>
    window.customHelperHatData = "Customer's Name: Jane Smith";
</script>

<!-- HelperHat Installation Script -->
<script async defer src="https://helperhat.com/install.js?businessId=123"></script>
This single-line example is straightforward. HelperHat's AI will recognize the customer's name and use it to create more personalized greetings and responses.
Tips & Best Practices:
- Dynamic Updates: Update
window.customHelperHatDatadynamically based on the currently logged-in customer's details and activities to ensure personalized interactions. - Data Accuracy: Ensure that the data provided is accurate and up-to-date. This allows HelperHat to deliver the most relevant and helpful responses.
- Protect Sensitive Information:
Do not include sensitive or personally identifiable information (PII) in
window.customHelperHatData. Only include information that is appropriate for customer service interactions, such as the customer's name or order history.Avoid including any of the following customer data:- Addresses
- Phone Numbers
- Social Security Numbers
- Financial Information
- Medical Records
- Passport Numbers
- Driver's License Numbers
- Taxpayer Identification Numbers
- Biometric Data
Sticking to non-sensitive customer details helps protect your customers' privacy and complies with data protection regulations.
- Data Formatting: HelperHat uses advanced AI models such as GPT, Llama, or Gemini to provide AI-powered responses to customer support inquiries. As long as your data is formatted in plain text or Markdown format that is easily understandable to a human, you can expect HelperHat's AI responses to be accurate as well.
To make sure HelperHat is correctly installed, follow these steps:
- Clear your browser cache to ensure you see the most up-to-date version of your website.
- Visit your website and navigate to a page where you added the HelperHat code.
- Look for the HelperHat widget to appear, usually at the bottom corner of your webpage.
If you see the HelperHat widget, congratulations! You've successfully installed HelperHat.
If the HelperHat widget does not appear:
- Double-check the code: Make sure you copied the entire HelperHat installation code without any changes.
- Verify the placement: Ensure the code is placed directly before the
</body>tag. - Confirm your HelperHat business has an active trial or subscription. The public widget does not appear for unsubscribed businesses.
- Review Trusted Domains in Settings. If trusted domains are configured, the current website domain or subdomain must match one of them.
- Confirm the code contains the correct
businessIdfrom your HelperHat account, especially if you manage multiple businesses. - Publish your CMS, theme, or tag-manager changes and clear any cache so the newest page code is loaded.
- Temporarily disable browser extensions, ad blockers, or privacy blockers while testing because they may block third-party scripts.
- If your site uses a strict Content Security Policy, allow the HelperHat script, app, Firebase, and Google Cloud endpoints required by the widget.
- Check your browser's console for errors: Sometimes JavaScript errors can prevent the widget from loading.
If you continue to experience issues, please contact us at [email protected] for assistance.
If you're not familiar with editing HTML or don't have access to your website's code, you can send the installation instructions to your webmaster. Click the "Email Instructions to Webmaster" button from your onboarding page to email your webmaster.
HelperHat Installation Guide for Popular Web Platforms
HelperHat works on all websites and platforms. To guide you better with the installation process, we have created specific guides for popular CMS platforms, e-commerce platforms, web frameworks, and application development environments.
The recommended WordPress path is the HelperHat AI Live Chat plugin from the WordPress Plugin Directory. It lets you paste your HelperHat business ID in WordPress Settings instead of editing theme files.
- Install and activate the HelperHat AI Live Chat plugin.
- Go to Settings > HelperHat.
- Paste your HelperHat business ID and save.
- Open your public website and confirm the HelperHat widget appears.
Read the full WordPress install guide for the plugin flow and the manual fallback.
- Make sure your Google Tag Manager container is installed on every page where HelperHat should appear.
- Add the HelperHat Live Chat template to your GTM workspace.
- Create a HelperHat tag, paste your business ID, and use the All Pages trigger.
- Preview the container, confirm HelperHat appears, and publish.
Read the full Google Tag Manager install guide for the Gallery flow and manual import fallback.
- Follow the steps above to copy the HelperHat installation code from your HelperHat account settings.
- Log in to your Shopify admin dashboard.
- In the left sidebar menu, navigate to Online Store > Themes.
- Click the Actions dropdown menu and select Edit code.
- Select the theme.liquid file for your theme.
- Paste your HelperHat installation code just before the
</body>tag in this file. - In the upper right, click Save.
- Follow the steps above to copy the HelperHat installation code from your HelperHat account settings.
- Log in to your WordPress dashboard and navigate to Appearance > Theme Editor.
- Open the
footer.phpfile of your theme and paste the code just before the closing</body>tag. - Click Update File to save your changes.
Note: Ensure you test the installation on your WooCommerce checkout and product pages to confirm it doesn't interfere with the user experience.
Use the App Market in Wix to add an HTML widget to your page:
- Follow the steps above to copy the HelperHat installation code from your HelperHat account settings.
- Go to Settings in your site's dashboard.
- Click the Custom Code tab in the Advanced section.
- Click + Add Custom Code at the top right.
- Paste the installation code in the text box.
- Set the Name of the new tool to HelperHat Installation Code.
- Under Add Code to Pages, click the radio button for All pages and use the dropdown menu to select Load code on each new page.
- Under Place Code in the section, click the radio button for Body - end option.
- Click Apply to save your changes.
- Follow the steps above to copy the HelperHat installation code from your HelperHat account settings.
- Log in to your Squarespace account.
- In the left sidebar menu, navigate to Settings.
- In the Website section of the menu, navigate to Advanced, then select Code Injection.
- Paste the installation code into the Header field.
- In the upper left, click Save.
- Follow the steps above to copy the HelperHat installation code from your HelperHat account settings.
- Log in to your Drupal admin dashboard.
- In the main navigation menu, navigate to Structure.
- Click Blocks.
- Click + Add Block.
- Enter the fields for your new block. Paste the installation code in the Block body field and then click Save block.
There are two ways to add your HelperHat tracking code to your Joomla site. With either method, follow the steps above to copy the HelperHat installation code from your HelperHat account settings first.
- You can select an extension from the Joomla Extension Directory where you can paste in the HelperHat installation code. Alternatively, you can follow the steps below to install the installation code:
- Log in to your Joomla account as an administrator.
- In the main navigation menu, navigate to Extensions > Templates > Templates.
- Click the name of your template and select index.php in the left sidebar menu.
- Paste the HelperHat installation code directly above the
</body>tag. - Click Save.
- Follow the steps above to copy the HelperHat installation code from your HelperHat account settings.
- Log in to your BigCommerce admin dashboard.
- Navigate to Storefront > Script Manager.
- Click Create a Script and select the following options:
- Location on page: Footer
- Pages where script will be added: All pages
- Paste the HelperHat installation code into the script content box.
- Click Save to add the code to your BigCommerce store.
- Follow the steps above to copy the HelperHat installation code from your HelperHat account settings.
- Log in to your Magento admin dashboard.
- Navigate to Content > Design > Configuration.
- In the list of available themes, click Edit on the theme you are currently using.
- Scroll down to the Other Settings section and click on HTML Head.
- Locate the Scripts and Style Sheets field.
- Paste your HelperHat installation code into this field.
- Scroll to the top of the page and click Save Configuration.
- Clear the cache by navigating to System > Cache Management and clicking Flush Cache Storage.
Note: It is important to clear your Magento cache after making these changes to ensure the HelperHat code is correctly loaded on your site.
- Follow the steps above to copy the HelperHat installation code from your HelperHat account settings.
- Open your Next.js project and navigate to the
_app.jsor_document.jsfile. - Import
useEffectfrom React (if using_app.js). - Use the following code in the
_app.jsfile:import { useEffect } from 'react'; function MyApp({ Component, pageProps }) { useEffect(() => { document.body.insertAdjacentHTML('beforeend', HELPERHAT_INSTALLATION_CODE); }, []); return <Component {...pageProps} />; } export default MyApp; - Replace
HELPERHAT_INSTALLATION_CODEwith the code you copied.
- Follow the steps above to copy the HelperHat installation code from your HelperHat account settings.
- Open your Gatsby project and navigate to the
gatsby-browser.jsfile. - Add the following code:
export const onClientEntry = () => { document.body.insertAdjacentHTML('beforeend', HELPERHAT_INSTALLATION_CODE); }; - Replace
HELPERHAT_INSTALLATION_CODEwith the code you copied.
- Follow the steps above to copy the HelperHat installation code from your HelperHat account settings.
- Open your React project and navigate to the main component (e.g.,
App.js). - Import
useEffectfrom React. - Add the following code inside your component:
useEffect(() => { document.body.insertAdjacentHTML( 'beforeend', HELPERHAT_INSTALLATION_CODE ); }, []); - Replace
HELPERHAT_INSTALLATION_CODEwith the code you copied.
- Follow the steps above to copy the HelperHat installation code from your HelperHat account settings.
- Open your Angular project and navigate to your main component (e.g.,
app.component.ts). - In the
ngOnInitmethod, add the following code:ngOnInit() { document.body.insertAdjacentHTML('beforeend', HELPERHAT_INSTALLATION_CODE); } - Replace
HELPERHAT_INSTALLATION_CODEwith the code you copied.
- Follow the steps above to copy the HelperHat installation code from your HelperHat account settings.
- Open your Vue.js project and navigate to your main component (e.g.,
App.vue). - In the
mountedlifecycle hook, add the following code:mounted() { document.body.insertAdjacentHTML('beforeend', HELPERHAT_INSTALLATION_CODE); } - Replace
HELPERHAT_INSTALLATION_CODEwith the code you copied.
- Follow the steps above to copy the HelperHat installation code from your HelperHat account settings.
- Open your Svelte project and navigate to your main component file (e.g.,
App.svelte). - Use the
onMountlifecycle function to add the code:import { onMount } from 'svelte'; onMount(() => { document.body.insertAdjacentHTML('beforeend', HELPERHAT_INSTALLATION_CODE); }); - Replace
HELPERHAT_INSTALLATION_CODEwith the code you copied.
- Follow the steps above to copy the HelperHat installation code from your HelperHat account settings.
- Open your Flutter Web project and navigate to the
web/index.htmlfile. - Paste the HelperHat installation code before the closing
</body>tag.
- Follow the steps above to copy the HelperHat installation code from your HelperHat account settings.
- Open your Django project and navigate to your base HTML template (e.g.,
base.html). - Paste the HelperHat installation code before the closing
</body>tag.
- Follow the steps above to copy the HelperHat installation code from your HelperHat account settings.
- Open your Flask project and navigate to your base HTML template (e.g.,
base.html). - Paste the HelperHat installation code before the closing
</body>tag.
- Follow the steps above to copy the HelperHat installation code from your HelperHat account settings.
- Open your Laravel project and navigate to your main Blade template
(e.g.,
layouts/app.blade.php). - Paste the HelperHat installation code before the closing
</body>tag:{!! HELPERHAT_INSTALLATION_CODE !!} - Replace
HELPERHAT_INSTALLATION_CODEwith the code you copied.
- Follow the steps above to copy the HelperHat installation code from your HelperHat account settings.
- Open your Rails project and navigate to your main layout file (e.g.,
application.html.erb). - Paste the HelperHat installation code before the closing
</body>tag:<%= raw HELPERHAT_INSTALLATION_CODE %> - Replace
HELPERHAT_INSTALLATION_CODEwith the code you copied.
- Follow the steps above to copy the HelperHat installation code from your HelperHat account settings.
- Open your ASP.NET Core project and navigate to your main layout file
(e.g.,
_Layout.cshtml). - Paste the HelperHat installation code before the closing
</body>tag:@Html.Raw("HELPERHAT_INSTALLATION_CODE") - Replace
HELPERHAT_INSTALLATION_CODEwith the code you copied.
- Follow the steps above to copy the HelperHat installation code from your HelperHat account settings.
- Open your Express.js project and navigate to your static HTML file
(e.g.,
index.html). - Paste the HelperHat installation code before the closing
</body>tag.
- Follow the steps above to copy the HelperHat installation code from your HelperHat account settings.
- Open your Spring Boot project and navigate to your main HTML template
(e.g.,
index.html). - Paste the HelperHat installation code before the closing
</body>tag.
- Follow the steps above to copy the HelperHat installation code from your HelperHat account settings.
- Open your Electron project and navigate to your main process file (e.g.,
main.js). - Use the following code to add the installation code in the renderer
process:
const { BrowserWindow } = require('electron'); // Create a new BrowserWindow and load your HTML let mainWindow = new BrowserWindow({ ...options }); mainWindow.webContents.on('did-finish-load', () => { mainWindow.webContents.executeJavaScript(` document.body.insertAdjacentHTML('beforeend', '${HELPERHAT_INSTALLATION_CODE}'); `); }); - Replace
HELPERHAT_INSTALLATION_CODEwith the code you copied.